

Installing a skylight is one of the most effective ways to transform a home in the Bronx, bringing in natural light, improving ventilation, and increasing property value. But unlike standard upgrades, skylight installation is a high-risk roofing modification. It involves cutting into a system designed to remain completely waterproof and structurally sealed.
The success of a skylight installation depends not on the unit itself, but on how well the roof is prepared, cut, flashed, and restored. Every roof type, whether asphalt shingle, flat, or metal, requires a different approach to ensure long-term leak-free performance. In a city like New York, where heavy rain, snow, and flat roof structures are common, even a small installation mistake can lead to leaks, insulation damage, and expensive repairs.
This guide explains how to install a skylight properly, how the process changes across different roof types, and what separates a professional installation from a costly mistake.
What Is a Skylight?
A skylight is a roof-installed window designed to bring natural light into areas that do not have exterior walls. Unlike traditional windows, skylights are part of the roofing system itself, which is why skylight installation requires proper sealing and structural support.
When done correctly, a skylight improves natural lighting, ventilation, and energy efficiency inside the home.
Skylight Installation Rules & Permits in Bronx, NYC
Before installing a skylight in the Bronx, you need to understand that this is not just a roofing task, it’s a regulated structural modification.
Professional contractors always consider:
- NYC Department of Buildings (DOB) permits may be required
- Roof alterations must follow the NYC Building Code
- Many Bronx homes have flat or low-slope roofs, increasing leak risk
- Snow accumulation and heavy rainfall demand perfect flashing systems
Skipping permits or code compliance can result in fines, failed inspections, or forced removal.
This is where most DIY attempts fail before even starting.
Tools & Materials Required to Install a Skylight
Essential Tools
- Circular saw
- Drill machine
- Measuring tape
- Hammer
- Utility knife
Required Materials
- Skylight unit
- Flashing kit (non-negotiable)
- Roofing underlayment
- Sealant (weatherproof)
- Nails/screws
Sealant is only a backup layer and does not replace flashing in any professional skylight installation process.
Safety & Structural Checks Before Installation
This is where amateurs make critical mistakes. Before installing a skylight, professionals always check:
- Rafters’ location (load path understanding)
- Attic clearance (no wiring or plumbing conflict)
- Roof pitch (controls drainage behavior)
- Water flow direction on that roof section
- Skylight size compatibility with framing
Cutting a load-bearing rafter without reinforcement can weaken your entire roof structure. Before you proceed with installing a skylight, make sure your roof structure is properly evaluated to avoid expensive repairs in the future.
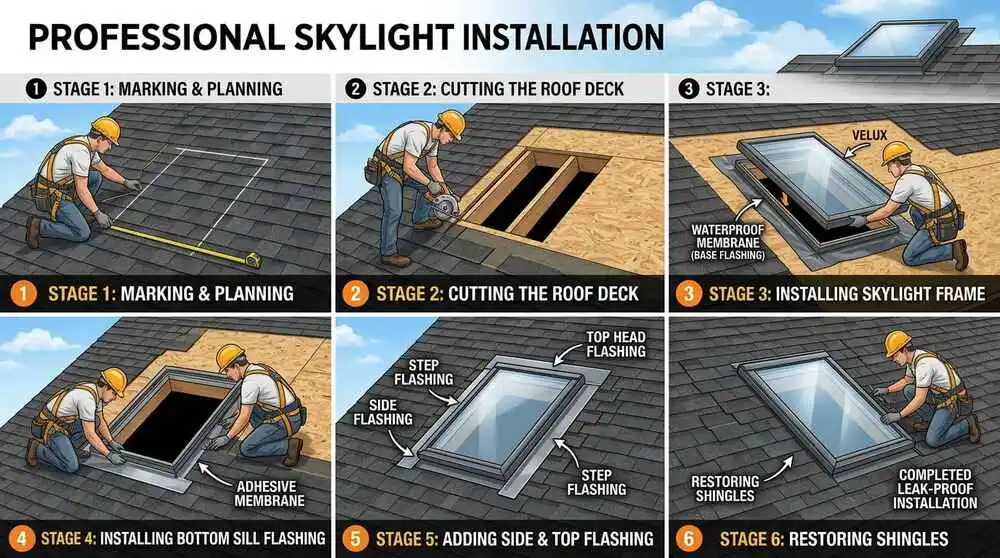
How to Install a Skylight: Step-By-Step
This Step-by-step guide is based on real roofing practices used by our professional roofing contractors in the Bronx, where flat and shingle roof systems require precise waterproofing techniques due to New York’s weather conditions.
Step 1: Selecting the Location and Planning from Inside the Attic
Every skylight installation begins inside the house, not on the roof. The attic gives you the only clear view of the roof structure, including rafters, wiring, plumbing, and ventilation paths. The first task is to determine the skylight size based on manufacturer specifications. Once that is confirmed, the installer studies the rafter spacing and chooses a location that ideally fits between two rafters. This avoids unnecessary structural modifications and simplifies framing.
At this stage, it is critical to check for hidden obstacles such as electrical lines or HVAC ducts. Ignoring this step can lead to expensive damage or unsafe conditions later. After confirming the position, a reference point is marked, and a long screw or nail is driven upward through the roof deck. This creates an exact location marker on the exterior roof surface.
Step 2: Locating and Marking the Roof Area
Once outside on the roof, the installer locates the reference point created from the attic. This becomes the center of the skylight opening. From here, the roof surface is carefully evaluated. The installer studies how water naturally moves across that section of the roof. Areas where water collects, such as valleys or intersections, are avoided because they increase leak risk.
The skylight opening is then outlined using chalk lines. Accuracy is essential because even a small deviation can affect how flashing aligns later. The opening must be perfectly square so that all components fit and seal correctly.
Step 3: Removing Roofing Material Around the Opening
The next step in professional skylight installation involves removing the shingles or roofing material around the marked area. This must be done carefully to avoid damaging surrounding materials that will be reused later.
Shingles are lifted using a pry bar, and nails are removed without tearing the material. The removal area is extended beyond the skylight opening to ensure enough space for flashing installation.
This step is not just about clearing space; it is about preserving the integrity of the surrounding waterproofing system.
Step 4: Cutting the Roof Deck
Once the surface material is removed, the roof deck is cut along the marked lines. The cutting must match the skylight rough opening exactly. The saw blade depth is adjusted so it only cuts through the decking material and does not damage internal structures. Cuts are made slowly and carefully to maintain control, especially at corners where overcutting is a common mistake.
Overcutting creates small gaps that cannot be fully sealed later, making them potential leak points. After cutting, the deck section is removed, exposing the internal roof structure. Precision is important here because mistakes during skylight installation can cause permanent gaps.
Step 5: Structural Framing Around the Opening
If the skylight opening interrupts rafters, structural framing must be added. This is one of the most important parts of the installation because it ensures the roof continues to carry loads correctly.
Horizontal headers are installed at the top and bottom of the opening to transfer weight. Vertical trimmers are installed on the sides to complete the load path. Without this step, installation of skylights can weaken the roof structure over time, which leads to misalignment and eventual seal failure around the skylight.
Step 6: Installing and Positioning the Skylight
The skylight unit is then placed into the prepared opening. Before fastening, the professional roofing contractor Bronx checks that it sits level and evenly within the frame.
At this stage, the installer checks:
- level alignment
- even spacing
- flush contact with the roof surface
Proper alignment ensures that the skylight integrates correctly with flashing and surrounding roofing material. If the unit is tilted or uneven, water may pool on one side, increasing long-term leak risk. Once confirmed, the skylight is securely fastened to the framing according to manufacturer specifications.
Step 7: Installing the Flashing System (Waterproofing Stage)
Flashing is the most critical part of skylight installation because it controls how water moves around the opening. Even a minor flashing mistake can lead to thousands in interior damage. The installation follows a strict sequence.
Bottom flashing first: directs water away from the base of the skylight
Side flashing: integrates with roofing material to create a layered water path
Top flashing last: prevents water from entering behind the skylight
This system works because it ensures water always flows over each layer instead of underneath it. If flashing is installed in the wrong order or with gaps, leaks will eventually develop regardless of how well the skylight is installed. Most skylight leaks reported after installation are directly related to flashing failure rather than the skylight unit itself.
If you’re dealing with leaks already, understanding common skylight leaks and how to fix them can help identify the exact failure point before repairs.
Step 8: Restoring the Roof Surface
Once flashing is complete, the surrounding roofing material is restored. Shingles or panels are carefully woven back into the system so that the roof maintains continuous water flow. Nails are placed in protected areas, and any exposed fasteners are sealed properly. A properly installed skylight should look like part of the original roof, not an added structure.
If you are unsure about waterproofing or sealing, hiring expert roofing contractors for professional skylight installation is strongly recommended to ensure leak-free performance.
How to Install a Skylight on Asphalt, Flat, and Metal Roofs
While the core process remains the same, the behavior of the roof material changes everything about how waterproofing and structure are handled.
Asphalt Shingle Roof (Most Common Installation)
Asphalt shingles are built in overlapping layers that naturally guide water downward. This makes them the most predictable and forgiving roof type for skylight installation.
The key challenge is maintaining that layered system when cutting into it. The flashing must integrate seamlessly with each shingle layer, so water continues to flow over the surface without interruption. Because shingles are flexible and easy to overlap, this roof type relies heavily on proper flashing technique rather than structural complexity.
If installed correctly, shingle roofs provide long-term reliability with minimal maintenance.
Flat Roof Installation (Highest Leak Risk if Done Incorrectly)
Flat roofs behave completely differently because water does not flow quickly. Instead, it tends to sit and slowly drain, which increases pressure on any opening.
This is why skylights on flat roofs must be elevated using a raised curb. The curb lifts the skylight above water level and creates a physical barrier against pooling.
The entire system depends on a continuous waterproof membrane such as EPDM or TPO. Any break in this membrane can lead to immediate leakage. Unlike shingle roofs, there is no natural water-shedding layer to assist protection; everything depends on sealing quality. Flat roof skylights fail most often due to poor curb construction or membrane errors, not the skylight itself.
Metal Roof Installation (Most Technically Demanding)
Metal roofs expand and contract with temperature changes throughout the day. This movement creates constant stress on any rigid seal. For this reason, skylight installation on metal roofs requires a flexible system. The opening must allow for slight expansion, and the flashing must match the profile of the metal panels.
Butyl tape is commonly used as a flexible sealing layer because it can move without breaking the seal. Screws must be tightened carefully using rubber washers to maintain waterproofing without restricting movement. If the system is too rigid, the expansion of the metal will eventually break the seal, leading to leaks over time.
When to Install a Skylight and When Not to Install a Skylight
Skylights are worth it if:
- Your space lacks natural light
- You want ventilation (bathrooms, kitchens)
- Your roof structure allows safe installation
Avoid skylight installation if:
- Your roof is already aging or damaged
- You have drainage issues (common in flat roofs)
- You’re not planning a professional installation
Installing a skylight on a weak or poorly draining roof is a guaranteed future leak.
Why Professional Skylight Installation Matters
DIY skylight installation saves money upfront, but costs more long-term. Poor installation can cause:
- Interior water damage
- Mold growth
- Structural issues
- Expensive repairs
Professional roofing contractors ensure:
- Proper flashing system
- Code compliance
- Long-term leak protection
Common Skylight Installation Mistakes to Avoid
- Skipping the building permit
- No flashing overlap
- Wrong roof pitch calculation
- Missing underlayment barrier
- Cutting rafters without framing
- Using silicone as the primary seal
- Poor water direction planning
Even a small mistake in installing a skylight can cause long-term leaks and also lead to thousands in repair costs.
Long-Term Skylight Maintenance Tips
Your skylight is only as strong as the surrounding roof.
- Repair damaged shingles immediately
- Keep drainage paths clear
- Check for water direction changes
- Inspect flashing annually
- Check for early moisture signs
- Clean debris buildup
- Monitor seal condition
Most skylight failures happen due to neglected maintenance.
Conclusion
A skylight installation is only successful when the roof system is properly preserved and rebuilt around the opening. The skylight itself is not the problem; installation quality is. Each roof type requires a different method: shingle roofs rely on layered flashing, flat roofs depend on waterproof curbs and membranes, and metal roofs need flexible sealing to handle expansion.
When installed correctly, a skylight can last decades with minimal issues. When installed incorrectly, even a high-quality unit can develop leaks and structural problems over time. For safe, durable, and leak-free results, always choose a trusted expert which provides professional skylight installation services instead of risking costly DIY mistakes.
FAQs
How long does skylight installation take?
Most skylight installations take between 4 to 8 hours, depending on roof type, structural changes, and weather conditions. Complex roofs, like flat or metal, may take longer due to additional waterproofing steps.
Are skylights expensive?
Skylight cost depends on size, type, and roof complexity. On average, a basic installation of skylights can range from affordable units with simple installation to higher-end systems that require structural modifications and professional flashing. Flat and metal roofs usually cost more due to added waterproofing and framing work.
Can I install a skylight on a flat roof?
Yes, skylights can be installed on flat roofs, but they require a raised curb system and a fully sealed waterproof membrane. This is necessary because flat roofs do not drain water quickly, so proper elevation and sealing are essential to prevent leaks.
How many years do skylights last?
A properly installed skylight can last 20 to 30 years or more. Lifespan depends on installation quality, roof type, weather exposure, and maintenance. Regular inspection of flashing and seals helps extend durability.
What is the biggest cause of skylight leaks?
The most common cause of skylight leaks is incorrect flashing installation. When flashing layers are not properly overlapped or water flow is disrupted, moisture can enter the roof system over time, even if the skylight itself is high quality.
Are skylights energy efficient?
Modern skylights can be energy efficient when installed with insulated glazing and proper sealing. They reduce the need for artificial lighting during the day, but performance depends on correct installation and roof insulation quality.